
The process of making your own ESLint rule can seem daunting – especially if you’ve looked at any of the code for rules that already exist. However, while there is a decent amount to think about and learn, you can do it. In this article, you’ll learn about the entire process of making an ESLint rule. Each step will be broken down and explained so that you can confidently begin making your own.
This tutorial was originally created for the ESLint team. You can find the PR for it here.
All this article assumes is that you:
- Are familiar with what ESLint is (if not, check out the getting started guide).
- Are somewhat familiar with JavaScript and npm.
- Have looked for existing ESLint rules and determined that none fit your needs (as it’s often times much better to use an existing one).
- Have little or no experience creating ESLint rules.
- Don’t necessarily understand how ESLint works internally.
Before you begin coding anything, though, there’s a few questions you’ll need to ponder.
What does the rule do?
This is the first question you should ask yourself, and it’s one you should spend some time truly thinking about.
For instance, let’s imagine that you’re a developer at a company and you’ve noticed a problem. Other devs at the company keep adding bacon to all sorts of identifiers (variable names, class names, function names, etc) for fun. You want to make a rule to warn people about this to try and make cleaner code, as none of your code relates to bacon.
You might initially think something like, “Okay, let’s have the rule search for identifiers that begin with bacon and raise a warning for that.” However, what if there were identifiers named bacongo or baConstructor? Are those acceptable? What about ba_con or b4c0n? Should you also add checks for underscores and leet speak? Or what about identifiers like pork – is that far enough away to be allowed?
By thinking through this now, you can not only make sure you actually want to implement this rule, but you can also make sure that you truly know what you’re getting yourself into. Furthermore, this will also make writing tests trivial.
For the bacon example, let’s go with the plan that you’ll add a warning for all identifiers that contain bacon while also ignoring cases (so somebAcon and baConstructor would both be rejected). However, it wouldn’t go as far as adding searches for underscores or leet speak (so ba_con and b4c0n would both be accepted).
Here are some examples that would cause this rule to fail (meaning the user gets a warning):
let bacona = "hello";
console.log(bacon);
function baConstructor() {}
function validName(bacon) {}
class someBaconClass {}
Here are some examples that would cause this rule to pass (meaning no warning):
let pork = 1;
console.log("bacon");
function ba_con() {}
class b4c0n {}
Who will benefit from this rule?
Now that you have some idea of how your rule will work, you should take some time to think about who would benefit from this rule. Some questions to ask yourself are:
- Is this a rule that would benefit just your company or is it something that other people might want?
- If this rule is specific to your company:
- Is it specific to a single project?
- Is it something that many different projects could benefit from?
- If this rule isn’t specific to your company:
- Is it something that benefits all JavaScript projects or is it more specific than that? For example, a rule that provides suggestions for TypeScript apps that use GitHub would be something that is beneficial for some projects, whereas a rule that suggests to not use
console.logwould be beneficial for all types of projects.
- Is it something that benefits all JavaScript projects or is it more specific than that? For example, a rule that provides suggestions for TypeScript apps that use GitHub would be something that is beneficial for some projects, whereas a rule that suggests to not use
Once you have those answers, you can then think about where the code for this rule will live.
Where will the code for the rule live?
There are four main places that new rules are commonly made:
- In the core ESLint repository
- For rules that are useful to all JavaScript projects
- In a plugin that already exists
- For rules that are useful to a specific subset of JavaScript projects
- In a new plugin
- For rules that are useful to a specific subset of JavaScript projects, but that don’t fit into any existing plugin
- Locally in a specific project either via the deprecated
--rulesdirflag or via creating a local plugin and referencing it in your dependencies using the file: prefix.- For rules that should remain local and / or don’t need to be shared
Note: A plugin is a way of sharing rules that relate to a specific type of project. Installing a plugin does not turn on all the rules in it. Rather, it just adds more rules that you can choose to apply or not.
I won’t go into more detail about what plugins are or how to make them in this article. Instead, I’ll focus on showing you how to make a rule in either the core ESLint repository or in a plugin that already exists. If you want to learn more about how to make plugins, though, please check out the Working with Plugins guide on the ESLint website.
How does ESLint parse code?
The last thing you need to think about before coding your rule is the topic of parsing code. It’s easy for us, as humans, to think, “Oh, I don’t want any identifiers with bacon in them.” Computers, unfortunately, are not that simple. They need ways to programmatically define what is an identifier vs. a function declaration vs. a literal and so on.
Fret not, though, as most of this work has already been done for us. ESLint uses Espree to parse JavaScript code into an ESTree-compatible format. You can think of it as a way of breaking up code into a giant tree that ESLint can then iterate over to check things.
There’s some extensive documentation you can check out that shows all the different types of nodes that code can be broken up into – but an even easier way is to use the AST Explorer.
AST Explorer lets you paste in JavaScript code and then shows you exactly what this tree looks like. You can click on any particular piece of code and you’ll see the keys and values for it on the right side of the page.
For the bacon example, let’s copy over two lines to take a look at:
let pork = "Meow";
function bacon() {}
If you click on let in the code section of AST Explorer, you should see a VariableDeclaration section highlighted on the right side. Likewise, if you click on function, you should see a FunctionDeclaration highlighted. But what if you click on pork or bacon? Fortunately for us, both of those cases show that Identifier is highlighted (See Figure 1).
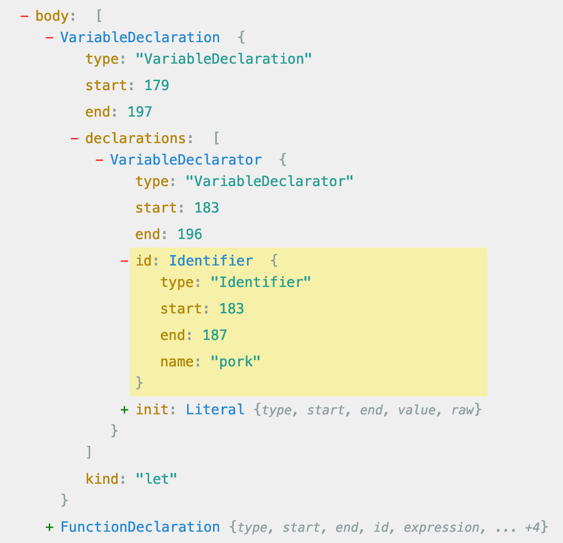 Figure 1: What an identifier in an Abstract Syntax Tree looks like
This piece is exactly what you’ll need to begin coding the bacon rule. You can see that if you find an Identifier, you can check for the name and see if it violates the bacon restrictions.
If you visit the ESTree Specification, you can see that Identifiers do indeed have a name field that is a string – which matches what we saw above.
Take some time to explore what code translates to what nodes by copying / pasting in various chunks of code that relate to the rule you’re trying to make. This will make it easier for you when you go to write the code for the rule.
Generate the files
It’s now time to go about actually making your rule. (Yay!) Each rule in ESLint has three files named with its identifier. A rule identifier is a short, high-level description of the rule in dash-case, such as prefer-const.
For the bacon example, the identifier could be something like no-bacon. In which case the three files would be:
tests/lib/rules/no-bacon.js– A test file where you will test the rule to make sure it works as expected. I’d recommend you begin by writing this before you write your source file.lib/rules/no-bacon.js– The source file where you will write the core logic of the rule.docs/rules/no-bacon.md– A Markdown file that explains what your rule does. It largely will contain the answers to the questions discussed above.
Before examining each file, there are a few important links you should be aware of:
- ESLint provides a Working with Rules guide that goes into a lot of detail about each of the files and what every property is. It’s something you’ll definitely want to check out when you start making your own rules.
- There is a Yeoman generator that aids in the creation of plugins and rules that you can find here. Once installed, it’ll ask you a series of questions and then generate all of the files in the correct spots for you – with much of the core code set up for you. I found it really useful in helping me get started with rules.
Test File (tests/lib/rules/no-bacon.js)
The Test File is what I’d recommend starting with. If you’ve followed along with the guide so far, the work you did earlier on deciding what will make your rule pass / fail can be used here. In fact the test file will consist almost entirely of those examples!
To begin your test file, you’ll want to import your rule and the ESLint RuleTester:
const rule = require("../../../lib/rules/no-bacon");
const RuleTester = require("eslint").RuleTester;
From there, you’ll want to create your own ruleTester object that you can use to run your test cases. You can provide it with options that will act as defaults for all the test cases.
For instance, the RuleTester, by default, uses ECMAScript 5. If you’re used to modern JavaScript, some of your test cases might not work. To fix that, you can specify parserOptions when you make this tester so that all your tests use ECMAScript 6 instead by using the ecmaVersion option:
const ruleTester = new RuleTester({ parserOptions: { ecmaVersion: 6 } });
After that, you’ll want to call run on the ruleTester object you made and pass in your rule as well as an object that contains valid and invalid test cases.
The valid array should consist of code that does not throw any warnings or errors. The invalid array should consist of code that does throw a warning or an error and the expected error that should occur.
Here’s what this would look like for the no-bacon example:
ruleTester.run("no-bacon", rule, {
  valid: [
    "console.log('bacon')",
    "function ba_con() {}",
    "class b4c0n {}",
    "const bac = 'hello'",
  ],

  invalid: [
    { code: 'const bacon = "hello"', errors: [{ messageId: "avoidBacon" }] },
    { code: 'const bacona = "hello"', errors: [{ messageId: "avoidBacon" }] },
    { code: "console.log(bacon)", errors: [{ messageId: "avoidBacon" }] },
    { code: "console.log(abacon)", errors: [{ messageId: "avoidBacon" }] },
    { code: "function bacon() {}", errors: [{ messageId: "avoidBacon" }] },
    {
      code: "function validName(bacon) {}",
      errors: [{ messageId: "avoidBacon" }],
    },
    {
      code: "function baConstructor() {}",
      errors: [{ messageId: "avoidBacon" }],
    },
    { code: "class bacon {}", errors: [{ messageId: "avoidBacon" }] },
    { code: "class someBaconClass {}", errors: [{ messageId: "avoidBacon" }] },
  ],
});
Right now, you can ignore the messageId part of this as the next section will talk about this in more detail. Just know that, when you go to write your rule, you’ll need to provide an error message with the key of avoidBacon (or whatever name fits your rule).
If you want to see what this file looks like entirely, check out the gist for it here.
With this test file sketched out, you can then run the command npm test to execute the tests, but they should all be failing right now.
Also, if you want to learn more about ESLint unit testing and all the options you can configure, check out the ESLint Rule Unit Tests doc.
Source File (lib/rules/no-bacon.js)
This is the file where your core code will be. It contains two main pieces:
- A
metaobject that defines high-level details about your rule such as a description of what it does, what type of rule it is, where you can find the docs, etc. - A
createfunction that returns an object that ESLint uses to determine whether or not some piece of code violates the rule or not.
More details about all of the flags and options can be found in the rule-basics section of the ESLint docs.
For now, let’s briefly talk through each of these pieces. I’ll start by showing you some code, and then I’ll talk through what each line does (you can find the gist for entire file here if that’s easier).
Meta Section
For the bacon example, the meta section would look like:
module.exports = {
  meta: {
    type: 'suggestion',

    docs: {
      description: "Don't allow bacon in identifiers",
      recommended: false,
      url: "https://eslint.org/docs/rules/no-bacon",
    },

    schema: [], // no options

    messages: {
      avoidBacon: "The word bacon was found in '{{identifier}}'"
    }
  },
  create(context) {
    // omitted for clarity
  }
};
Let’s discuss some of the keys:
- The
typekey (line 2) is one of'problem','suggestion', or'layout'depending on how you think the rule should be configured. In the bacon example, I settypetosuggestiondue to the fact that identifiers with the name of bacon won’t actually cause any errors. Rather, I am suggesting they make the change for stylistic purposes. - The
recommendedkey (line 6) is eithertrueorfalsedepending on if it should be a default for anyone using the recommended ESLint rules. In the bacon example, I setrecommendedtofalsebecause this rule should not be a default rule for anyone using ESLint. - The
schemakey (line 10) allows you to add options to the rule so that people can configure it in different ways. In the bacon example, I leftschemaas[]because there are no options to configure. An example of something that could be added in the future would be flags likeallowBaconInClassNamesorpreventUnderscoredBacon– which could then change what the rule does. - The
messageskey (line 12) is a way of providing one or more warnings / errors for the user. By defining these here, it makes it so you don’t have to copy the same message to many different files or locations. For instance, the tests I wrote above only have to reference the key ofavoidBaconinstead of copying the entire message to that file. - In the
avoidBaconmessage (line 13), you can see that I haveidentifiersurrounded by double brackets. By enclosing a variable name in double brackets like this, I’m telling ESLint that this warning message expects a variable calledidentifierto be passed in. I’ll need to add that in the context section below. You can use this to provide better error messages to your users.
If you want to learn more about what flags and settings exist, please read the ESLint Rule Basics guide.
Context Object
For the bacon example, the context object could look like the code below.
Note: With the way this rule has been coded, a line of code like let a = bacon would cause this rule to fail. The bacon variable could come from elsewhere so it’s possible the variable wouldn’t be able to be changed.
module.exports = {
  // meta omitted for clarity

  create(context) {
    return {
      Identifier(node) {
        const identifier = node.name;

        if (identifier.toLowerCase().includes("bacon")) {
          context.report({
            node: node,
            messageId: "avoidBacon",
            data: {
              identifier,
            },
          });
        }
      },
    };
  },
};
All rules need to have a create() method in them. What’s inside of the method, though, is where the differences lie. Let’s talk through a few key pieces:
- The object returned from the
create()method tells ESLint which nodes the rule is interested in. When ESLint traverses an AST, it stops on the specified nodes to run the code from your rule. The simplest rules, like our bacon one, specify one specific type of node and then run someifstatements to check whether or not the rule is violated. More advanced rules will provide many different types of nodes and functions in combination.- Remember earlier how you used the AST Explorer to get a better understanding of how code is broken down? You’ll now put that to use here. In the bacon example, I’ll use
Identifier(node) {}as that matches thetypefrom AST Explorer. In there, I’ll add code to detect when the rule has been violated. For your rule, you’ll want to use the appropriate type you determined from AST Explorer, such asVariableDeclarator(node) {}orAssignmentExpression(node) {}.
- Remember earlier how you used the AST Explorer to get a better understanding of how code is broken down? You’ll now put that to use here. In the bacon example, I’ll use
context.report()is how you let ESLint know that something violated the rule. When you callcontext.report(), you’ll want to provide anodeobject and amessageIdthat has the same key as the one in themetasection. You can also provide extra data so the user has a better idea of what went wrong (such as by showing them the identifier that has bacon in it).
If you want a more detailed look into everything around the context object, please read the ESLint Context Object docs.
Markdown File (docs/rules/no-bacon.md)
The last file needed for a rule is a markdown file that explains to others everything they need to know about your rule. At the very least you should include:
- A high-level summary of the rule
- A section called
Rule Detailsthat provides examples of incorrect / correct code for the rule - A section called
When Not To Use Itthat explains when this rule shouldn’t be applied
Figure 2 shows what this might look like for the bacon example. You can also find a gist of it here.
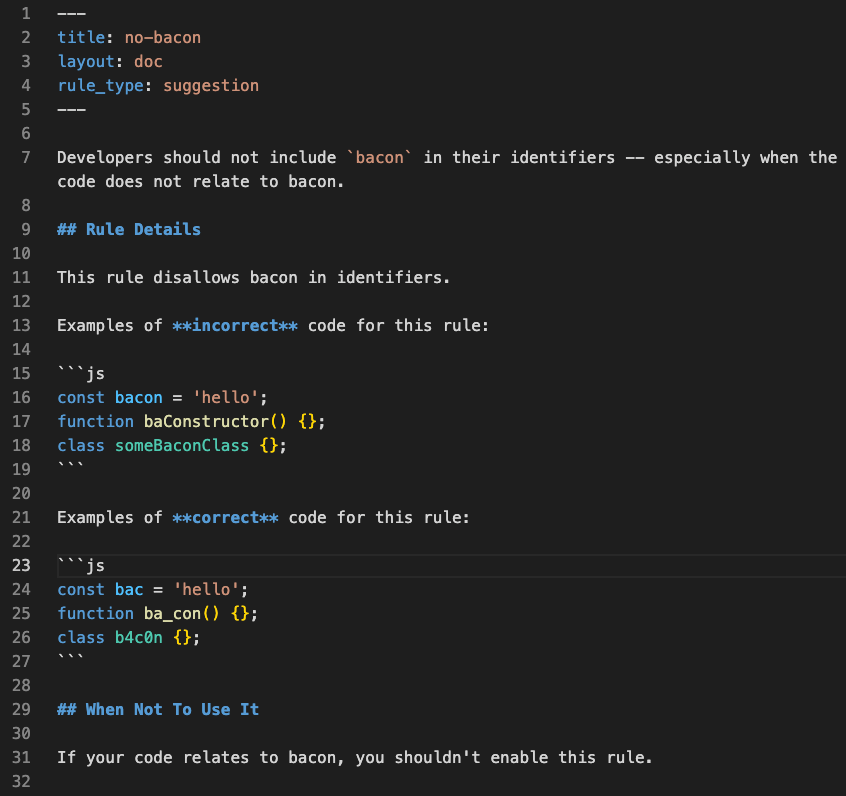 Figure 2: What the markdown file might look like for the no-bacon rule.
If you want to see what markdown files exist for other rules, you can find them in the ESLint rules directory. By looking over these rules, you can find examples of what it looks like if your rule has extra options or is more complicated than the bacon example.
Wrapping Up
Great job for making it this far! The last few steps are code review / deployment – but as that’s dependent on where you wrote your rule, I’ll leave that to you to figure out.
Hopefully this article helped you in your quest for making a custom ESLint rule. If you do still have questions, I’d recommend reading through the excellent ESLint docs or asking in the ESLint Discord.
Thanks for reading!