
Zapier supports many different types of authentication schemes for 3rd-party integrations. When working with these integrations, it’s important to understand what these different authentication schemes are and why some are better than others. Let’s talk through each of them to not only make sure you understand what Zapier needs, but also to understand what they are in a general sense and their corresponding pros and cons.
Please note this is just a high level summary that I wrote internally at Zapier to give people (especially more junior devs) a basic understanding of auth. It was written to try and be a friendly introduction to authentication – not as an overarching guide. Also note that some links or pieces are redacted as part of making this public. Many concepts such as what POST requests are were linked to other docs I wrote internally to give further context. This was also written in Coda, but I’ve since done my best to copy / paste it to markdown. Some formatting may be strange, though.
Authentication Schemes
Basic Auth
High level overview
Basic Auth is the simplest of the authentication flows. A user provides a service (like Zapier) with their username and password to a separate site / service (like Gmail). Zapier (or another service) would then pretend to be the user by using their credentials to make API calls to do various things (such as send an email).
How does it work?
The end user provides their username and password to the app making the request (in our case - to us - Zapier). The app then takes the username and password and concatenates them with a “:”. It then base64 encodes them.
Please note that this does not provide any type of security for the username and password. Rather,
it just ensures that the text is HTTP-compatible. From there, any requests made will include a
“header” that looks like: Authorization: Basic <encodedCredentials>.
For instance, let’s say our username is awesomeUser and our password is hunter2:
- We’d take the two and combine them together like:
awesomeUser:hunter2. - We’d then take that string and base64 encode it - which would look like:
YXdlc29tZVVzZXI6aHVudGVyMg==. - When we’d go to make an HTTP call, we’d provide a Header of:
Authorization: Basic YXdlc29tZVVzZXI6aHVudGVyMg==
In order to help make sure this is secure - all API calls must be made with HTTPS rather than HTTP.
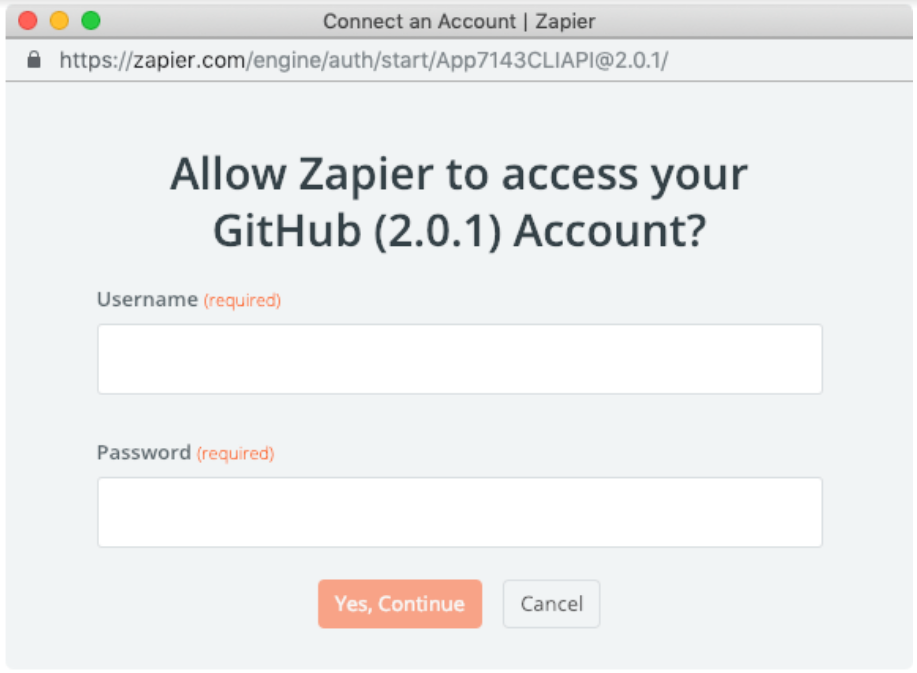
How does Zapier use it?
Zapier provides a pre-built form that asks the user for their username and password. We then take those in and make a test call to confirm these work as expected (apps need to specify what call to make). If the credentials do work, we encrypt them and store them to be used in subsequent API calls Zapier makes.
Pros?
- It’s very simple to implement and use - both for the client (Zapier) and the server (the app itself).
- It’s clear to the end user what all the pieces are and where they’d obtain them.
Cons?
- There is no customization on what permissions the user grants us. We have full access to everything they do - even if the user doesn’t want to provide access to all of those things.
- This requires Zapier to store the users’ credentials.
- It’s not customizable on the Zapier end - so all you get is just these two fields.
- It’s harder for users to remove access or even know that their data is being accessed. In other types of authentication schemes, it’s possible for users to see the connections both in Zapier and in the apps themselves and remove permission from either side.
When to use it?
Basic Auth should only be used if the API itself uses Basic Auth and does not offer any alternatives. Also note that, in Zapier’s case, you can’t provide any additional data when the app specifies basic auth - so if you need more data - you’ll need to use a different type of auth (such as API key authentication).
Example
Redacted as it linked to internal code.
OAuth V1
Many luxury cars come with a valet key. It is a special key you give the parking attendant, and, unlike your regular key, it will only allow the car to be driven a short distance while blocking access to the trunk and the onboard cell phone. Regardless of the restrictions the valet key imposes, the idea is very clever. You give someone limited access to your car with a special key, while using another key to unlock everything else.
This is the basic idea behind OAuth v1 - rather than providing someone full access to everything you own (such as with Basic Auth) - you can provide access to only the pieces you want them to have access to.
For example, a web user (resource owner) can grant a printing service (client) access to their private photos stored at a photo sharing service (server), without sharing their username and password with the printing service. Instead, they authenticate directly with the photo sharing service which issues the printing service delegation-specific credentials.
How does it work?
OAuth is a pretty complicated process to fully understand. If your goal is to have a vague idea of how this works at a high level, I’d just read the next few lines and skip the large chunks about how each step works. However, if you want to get into the nitty-gritty, you can go ahead and continue, and hopefully it’ll make some amount of sense. Don’t feel too bad if it doesn’t, though - it’s taken me a long time to understand.
There are three core steps to the OAuth v1 flow:
- Temporary Credentials Acquisition: The client gets a request token (aka temporary credential) from the server.
- Authorization: The user “authorizes” the request token to access their account.
- Token Exchange: The client (aka Zapier) exchanges the request token for an access token (aka long lived credentials).
Temporary Credentials Acquisition
In the first phase, the goal is to obtain a “Request Token” (also known as “Temporary Credentials”). This token does not grant any access to data, and it can’t be used for anything outside of the authorization flow. Rather, it is a way that gives users the ability to check what permissions may be given and accept / deny without actually passing around anything that could be abused to steal data.
There are a few things needed for this step:
- The client (such as Zapier) needs to know where to make a POST request to obtain these temporary credentials. The typical endpoint is something like
server.example.com/oauth1/request. - The client (Zapier) also needs a variety of variables:
oauth_consumer_key- Often referred to as the “client_id”. You can think of this as a sort of username for a particular piece of software. This is often generated for you by a service when you express interest in interacting with their API, usually by filling out some type of form on their site.oauth_consumer_secret- Often referred to as the “client_secret”. You can think of this as a sort of password for a particular piece of software. Like the consumer key, this is often generated for you by a service when you express interest in interacting with their API, usually by filling out some type of form on their site.oauth_signature_method- Honestly I’m not super sure all the details around it. I’ve typically “Black boxed” this - meaning that I just fill in whatever the API says or leave it as empty and let Zapier handle the defaults. OAuth v2 simplifies the signature stuff a lot.oauth_callback- Often referred to as the “redirect_uri”. This is what the server will call in the next step (Authorization). More on this explained down there.
- Once all of those things are obtained, the client will make a POST request using all of those pieces and get back the request token - which will be used in future steps.
Authorization
The next step is a user-facing step that most people who have signed in to places will be familiar with. You get taken to some site that asks for your permission to grant access to your data and you can choose to accept it or not or (sometimes) even select what permissions you want to grant.
The steps for this are:
- The client (such as Zapier) needs to know where to send the user to to login and grant permissions. The typical endpoint is something like:
server.example.com/oauth1/authorize. - The client appends the request token received in the previous step to the URL as a query parameter. This parameter is typically called:
oauth_token. - The client directs the user to said URL by either redirecting them to that page or, in Zapier’s case, opening a new small pop-up style window that loads that page.
- The user then logs in if they aren’t already logged in (in some cases if the user has logged in elsewhere in the browser, everything will magically happen behind the scenes). The user can then cancel or select which permissions are acceptable (if the option is given).
- If the user authorizes the client (Zapier), then the site marks the request token as “Authorized” and redirects the user back to the
oauth_callback(akaredirect_uri) from the Temporary Credentials Acquisition step. During this redirect, there are two extra query parameters added:oauth_token(aka the request token / temporary credential token) andoauth_verifier, which is a special security token that needs to be passed to the next step.
Token Exchange
In the final step, the goal is to take the request token (also known as the temporary credentials)
and turn it into an access token (also known as long-lived credentials). This request will also
destroy those temporary credentials so that someone evil can’t just take the temporary credentials
and use them again and again.
The steps for this are:
- The client (such as Zapier) needs to know where to make a POST request to exchange the request token for an access token. The typical endpoint for this is something like
server.example.com/oauth1/access. - The client makes a request to said endpoint and includes the
request tokenalong with theoauth_verifierwe mentioned above, as well as a variety of other things such as the client id / secret. - The server we’re making the request to again checks the key, the signature, the verifier key, etc to ensure that everything is kosher.
- If everything worked out alright, the server responds with an
oauth_tokenand anoauth_token_secret. Theoauth_tokenshould match what we sent over and theoauth_token_secretis theaccess tokenwe’ll use to make API calls in the future. - At this point in time, the temporary credentials are useless and can be discarded.
How does Zapier use it?
- Zapier makes a call to the specified API requesting a “request token”.
- Zapier sends the customer who is trying to set up a Zap to the authorization URL (which is defined by the particular app) along with the above request token.
- The user then authorizes and the app is expected to send the user to the
redirect_urithat Zapier provides (which can be obtained via thezapier describecommand after OAuth1 is specified as the authentication type). - Zapier makes an API call to the app to exchange the request token for an “access token”.
- Zapier remembers the access token and makes calls on behalf of the user.
For a more detailed look into all of this - please look here: https://zapier.github.io/zapier-platform/#oauth1
Pros?
- Allows users to grant filtered / restricted access to other services.
- Allows users to easily remove permission for specific services without having to update common things like a username and password.
- Does not require Zapier to store someone’s username and password.
- For Zapier apps - there’s the flexibility of adding as many auth fields as you need.
Cons?
- Access tokens are oftentimes very long lived and anything that lives for a long time has some inherent level of risk (gives people more time to obtain it and has a bigger impact if it accidentally gets leaked).
- It can be confusing for people to understand all the steps and what is needed where.
- For Zapier - it is only available via the CLI (so no visual builder).
When to use it?
In general, you should only use OAuth v1 if the API doesn’t support OAuth v2. OAuth v1 is only supported via a CLI app in Zapier. Users trying to make a visual builder app will not be able to make an app that uses this.
More Resources
Redacted as it linked to internal docs.
OAuth v2
OAuth v2 is very similar to OAuth v1 in terms of benefits and structure at a high level. I’d recommend giving the OAuth v1 high level overview a read and then coming back here. With that being said, OAuth v2 is a breaking change from OAuth v1. There were a lot of issues with v1 that we don’t really need to worry about in our day-to-day lives at Zapier.
If you want to know more about all the details, I’d recommend giving this article a read: redacted-link as well as this Stack Overflow answer: https://stackoverflow.com/questions/4113934/how-is-oauth-2-different-from-oauth-1
What is worth knowing about v1 vs. v2 in Zapier would be:
- OAuth v2 grants short lived access tokens and long lived “Refresh tokens” (which are used to re-obtain access tokens). In contrast, v1 tends to grant access tokens that live for a year or longer (Twitter had tokens that lived forever!)
- OAuth v2 works for more types of devices - such as non-browser based applications.
- The signature pieces from OAuth v1 are much less complicated.
How does it work?
- A user wants to connect to some site (let’s say they want to post to Twitter). They come to a service like Zapier and say, “hey I want to do that”.
- Zapier says, “Great - let me go ask permission.” So Zapier reaches out to Twitter and says, “I have this user that wants to post to you - can I have a request token?”
- Twitter is like sure here’s the request token and a secret.
- Zapier takes that token and secret and sends that off along with directing the user to the expected Twitter page to login. (There’s some inherent danger here cause Zapier could send them to an evil place that looks like twitter to steal their credentials - so users have to be careful who they trust).
- The user logs in to Twitter and tells Twitter, “ya I really want Zapier to be able to do this - please authorize this request token you gave Zapier”.
- Twitter lists out all the permissions that Zapier is going to get if the user approves. The user looks at them and is like, cool, yep, that looks good.
- Twitter marks the token as “good-to-go” so when Zapier requests access, it will be accepted (presuming it is signed with the appropriate secret).
- Zapier takes the request token and is like, “hey Twitter - can I get an access token for this request token?”
- Twitter examines it along with the secret and confirms the user gave permission and is like, “Sure okay here’s the access token (and sometimes here’s also a refresh token)”.
- Zapier then uses said access token to post to Twitter. If Zapier was given a refresh token, then if Zapier tries to make a call and it fails due to being unauthorized - Zapier can try to re-obtain a new access token by sending over the refresh token along with the secret again.
How does Zapier use it?
- Zapier sends the customer who is trying to set up a Zap to the
authorization URL(which is defined by the particular app). - The user then authorizes (typically by logging in).
- The app is then expected to send the user to the
redirect_urithat Zapier provides (which can be obtained via thezapier describecommand after OAuth2 is specified as the authentication type) and acodeis added as a query param to theredirect_uri. - Zapier makes an API call to the app to exchange the
codefor anaccess tokenand (sometimes) arefresh token. - Zapier remembers the access token and the refresh token and it makes calls on behalf of the user.
- If the access token expires (we get a 401), and the app has enabled auth refreshing, Zapier will automatically make the request to obtain a new access token.
For a more detailed look into all of this - please look here: https://zapier.github.io/zapier-platform/#oauth2
Pros?
- The most common of auths for good apps nowadays – so learning about this can unlock a ton of apps.
- Access tokens don’t necessarily live forever and can be refreshed - making it much more secure and sustainable than v1 or other types of auth.
- Allows users to grant filtered / restricted access to other services.
- Allows users to easily remove permission for specific services without having to update common things like a username and password.
- Does not require Zapier to store someone’s username and password.
- For Zapier apps - there’s the flexibility of adding as many auth fields as you need.
Cons?
- The OAuth flow can still be confusing and difficult to understand at first.
When to use it?
If OAuth v2 is an option - you should use it. As of right now (January 2020) - it’s the best authentication option we have in terms of ease of use and sustainability.
Example App
Redacted as it was internal.
Custom / API Key Auth
When making a CLI app, this is referred to as “Custom Auth”. When making an app in the visual builder, this is referred to as “API Key Auth”.
This type of auth is typically for apps that generate an “API Key” of some kind and the users then use that key to authenticate. This is a step up from basic auth in the sense that it’s not their username and password so we don’t just get blanket access to their whole account, but it’s a step down from OAuth because there’s no restrictions or scopes that the user can approve or not. It’s also a bit more strange as it requires the user to login and obtain the key from somewhere rather than just login.
How does it work?
A user logs in to some service, goes somewhere, and then obtains an API key. Oftentimes this appears under a settings page of some sort and there’s a button that’s like “Get API Key” or “ZapierAPI Key”.
Once the user obtains said API key, they share that with a client (such as Zapier). The client then formats that API key in some manner (usually by base64 encoding it and sending it over as a header). The service then recognizes said API key and returns some data.
How does Zapier use it?
The flow typically goes something like this:
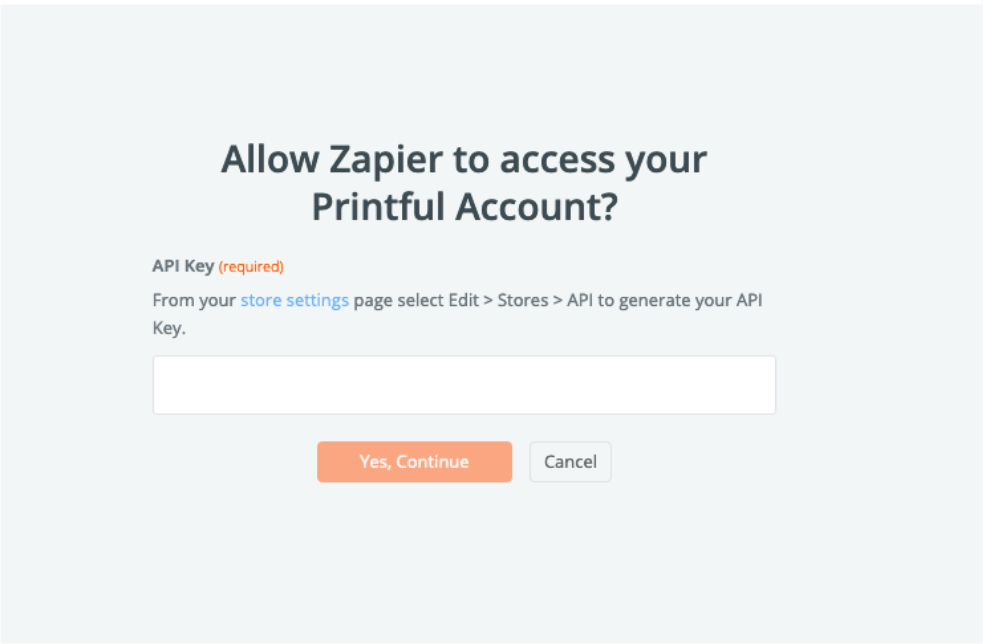
- A user selects an app in Zapier that uses this type of auth and a pop-up appears asking them to obtain an API key. In the ideal world, this pop-up would link to the exact page they need to go to to obtain said API key.
- The user obtains said API key and enters it there.
- Zapier calls a page that the app specified as a “test” with said API key (after transforming it based on a pre-request section the app defines) and confirms we get a valid result back.
- Zapier stores said API key for use in future API calls.
For a more detailed look into all of this - please look here: https://zapier.github.io/zapier-platform/#custom
Pros?
- It’s very simple to understand both from a user perspective and also from a coding perspective.
- It’s easier for a user to revoke or regenerate if something goes wrong.
Cons
- Sometimes users can only have one API key.
- Users can’t specify what permissions they want to give - nor do they know what permissions they’re granting access to.
When to use it?
If OAuth v2 is offered over this - you should use that instead. However, I’ve never seen an app offer both OAuth and an API Key. This option is preferable to basic auth if you have to pick one.
Example app
Redacted.
Base 64 Encoding
There are a few important things to know about Base64 encoding:
- It does not encrypt the data in any way. Even though it may look unreadable - the data can be translated back and forth easily - without any type of key or password.
- It is primarily used to take in binary data (think 0s and 1s) like an image and turn it into text - which can then be transmitted more easily.
- Sometimes it is used to take text (such as a password) that contains non-HTTP-compatible characters and turn said text into something that contains only HTTP-compatible characters.
Other than the above things - you can largely abstract this out as a black box (at least for working with apps in Zapier). If you do want to learn more about it or see specific examples, though, I’d recommend checking out this Wikipedia page.
Concluded Remarks
Hopefully these explanations helped you. If you need further assistance, please don’t hesitate to ping me in Slack or shoot me an email. I’d be happy to set up a pairing session to talk through any of these.